Sunday, June 26, 2011
How to make a Karambit knife
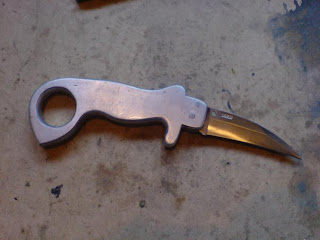
How to make a Karambit or Kerambit Knife from old scrap metal and cheap knives - although this entry shows how to make a Karambit, this will not be a true tutorial, more just a blog entry showing and describing the general process.
Made using a curved blade from a cheap $10 knife, and some 12mm aluminium, a few nails (used as pins) a drill, a hand saw, a couple of different drill bits, a hammer and flat screwdriver, some files and sandpaper and vice.
The whole process takes about 4-6hrs depending on experience and tools.
First the design is drawn out on paper, then cut out and using a marker pen the design is marked on the aluminium.
Then the design is cut out using the drill to drill holes inside the finger hole marks and on the outside of the general curves, and the handsaw to cut the straight lines.
Then the saw is used to cut between the drill holes and the hammer and screw driver to chisel out between the drill holes in the finger hole.
Once the general rough design is removed it is then filed smooth using various rough files, working your way up to finer files.
The slot for the blade is then cut using the handsaw, and various drill holes are drilled for the pins that hold the blade.
The blade is inserted then the pins are hammered down to so they will not come out.
Once the blade is in place the handle is then rounded over and sanded smooth.
When its smooth it is them sanded using very fine wet dry sandpaper until it becomes very sooth,
All it needs now is polishing and its done, you have your very own Karambit.
If you like making you own knives I'm sure you'll love trying the method.
If you would like to see more of the Karambit knife in this blog click HERE
Please leave a comment below letting me know what you think! Thanks.
Labels:
custom,
custom fit,
DIY,
home made,
homemade,
how to make,
knife,
knives,
tutorial,
weaponcollector
Subscribe to:
Post Comments (Atom)


No comments:
Post a Comment